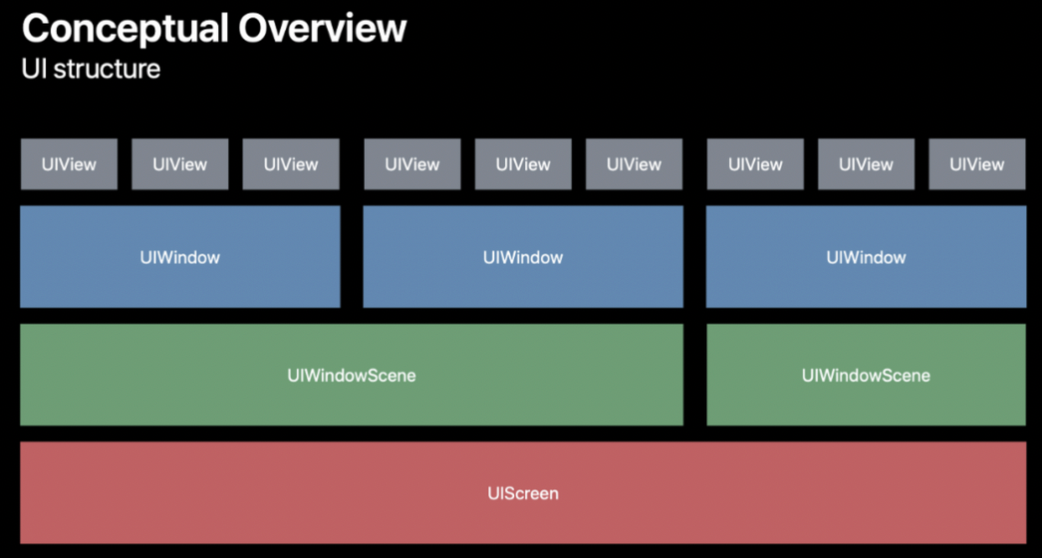
가장 아래에 있는 UIScreen부터 찾아봄
UIScreen

하드웨어 기반 디스플레이와 관련된 속성을 정의하는 객체.
클래스로 선언되어 있고 하드웨어 변수들이랑 연관되어 있는 클래스임
생각해보면 UIScreen.main.bounds ... 이런거 많이 썼었음
iOS devices have a main screen and zero or more attached screens. A tvOS device has a main screen for the television connected to the device.
UIWindowScene objects provide screen objects for the screen that displays their content. Each screen object defines the bounds rectangle for the associated display and other interesting properties such as its brightness.
In iOS 8 and later, a screen’s bounds property takes the interface orientation of the screen into account. This behavior means that the bounds for a device in a portrait orientation may not be the same as the bounds for the device in a landscape orientation. Apps that rely on the screen dimensions can use the object in the
fixedCoordinateSpace property as a fixed point of reference for any calculations they must make. (Prior to iOS 8, a screen’s bounds rectangle always reflected the screen dimensions relative to a portrait-up orientation. Rotating the device to a landscape or upside-down orientation didn’t change the bounds).
UIWindowScene 오브젝트가 Screen 오브젝트(컨텐트를 보여줄)를 제공한다. UIScreen을 위해서
각 스크린 오브젝트는 정의한다. 사각형 테두리를(연관되어 있다. 화면과 흥미로운 변수(예를 들어 밝기))
번역을 직독직해하면 이런것 같다.
그러니깐 UIWindowScene이 UIScreen위에 화면을 띄운다고 이해하면된다. 그럼 UIWindowScene은 뭐지?
UIWindowScene

화면인데 앱 window를 관리한다. 보면 UI Structrue보면 UIWindowScnee이 여러개의 UIWindow를 갖고 있긴했어
그럼 Window를 먼저 보자.
UIWindow

UIWindow는 사용자 인터페이스, 중요한 이벤트 처리를 제공하는 배경이 되는 객체입니다.
설명에도 아래와 같이 적혀 있음
Windows work with your view controllers to handle events and to perform many other tasks that are fundamental to your app’s operation
func scene(_ scene: UIScene, willConnectTo session: UISceneSession, options connectionOptions: UIScene.ConnectionOptions) {
    // Use this method to optionally configure and attach the UIWindow `window` to the provided UIWindowScene `scene`.
    // If using a storyboard, the `window` property will automatically be initialized and attached to the scene.
    // This delegate does not imply the connecting scene or session are new (see `application:configurationForConnectingSceneSession` instead).
    guard let windowScene = (scene as? UIWindowScene) else { return }
    window = UIWindow(frame: windowScene.coordinateSpace.bounds)
    window?.windowScene = windowScene
    window?.rootViewController = UINavigationController(rootViewController: ViewController())
    window?.makeKeyAndVisible()
}
생각해보면 StoryBoard 없이 코드만으로 View를 작성할 때에도 대부분 위의 코드를 따른다.
func scene(_ scene: UIScene, willConnectTo session: UISceneSession, options connectionOptions: UIScene.ConnectionOptions) {
    guard let windowScene = (scene as? UIWindowScene) else { return }
    window = UIWindow(frame: windowScene.coordinateSpace.bounds) // 1. Window를 생성하고
    window?.windowScene = windowScene // 2. window는 windowScene 위에 올라가야하므로 windowScene를 설정해주고
    window?.rootViewController = UINavigationController(rootViewController: ViewController())
    window?.makeKeyAndVisible()
}
코드를 치면서 아무런 생각없이 쳤었던 코드를 반성한다. Swift는 다 계획이 있었던거임...

다시 돌아와서 UIWindowScene를 보자
다시 UIWindowScene
WindowScene는 Scene인데 여러개의 window를 관리하는 앱이다.
-> UIWindow 관리하는 Scene이다!
그럼 어떻게 관리를 할까?
UIWindowSceneDelegate 와 UISceneDelegate를 통해서 관리한다.
UIWindowSceneDelegate는 UISceneDelegate를 포함하고 있다.

앱의 특정 일이 발생 했을 때 관리해주는 Delegate이다.
예를 들어, 화면 사이즈가 변했을 때에 작동하는 메소드들이 있다.

Scene의 Life-cycle에 응답하는 Delegate이다.
예를 들어, 앱이 Foreground 혹은 Background로 진입 했을 때에 작동하는 메소드가 있다.
참조
https://zeddios.tistory.com/283
애플 공식 문서
'Swift > Apple Framework' 카테고리의 다른 글
| [SwiftUI] Who is retaining @StateObject and ObservedObject (0) | 2023.01.12 |
|---|---|
| [iOS / Swift] ARC (0) | 2023.01.11 |
| [iOS / Swift] Heap 그리고 Stack (1) | 2023.01.11 |
| [iOS / Swift ] iOS 메모리 구조 (0) | 2023.01.11 |
| [Swift/iOS] 앱 클립(App Clips) 만들기 (0) | 2022.06.09 |